- Published on
Caddy Example: Ad Agency
- Authors

- Name
- Alex Lee
- Title
- CEO
- @alexjoelee
Welcome back! We've designed a full Caddyfile based on an ad agency scenario to give you an example of how to use Caddy at scale. You should check out this article on the Caddy forums to learn more about using on-demand TLS to serve tens of thousands of websites.
Background: What is On-Demand TLS?
Caddy has pioneered On-Demand TLS, which dynamically obtains a new certificate during the first TLS handshake that requires it, rather than at configuration load. Skip2 uses on-demand TLS for our customers sites and custom URLs.
Scenario: Ad Agency
In this post, we're going to create a web hosting architecture that would be used by an advertising agency to serve tens of thousands of websites. We will cover logging, caching, proxying web traffic, and serving dynamically-generated error pages. By the end of this article you should be a Caddy pro.
Deployment Architecture
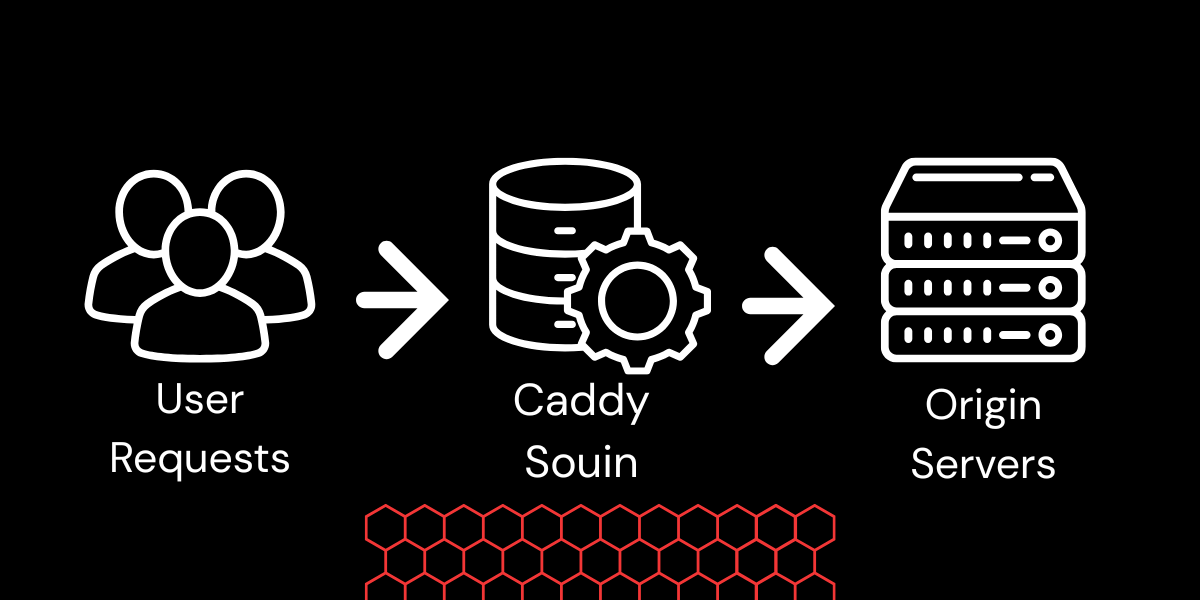
The deployment architecture will be fairly simple. One or more Caddy servers which are responsible for receiving user requests, serving cached content, and proxying requests upstream to the origin servers. There are several origin servers, all serving the same content from the same database.
Justification
This architecture will work well for an agency seeking to serve lots of content quickly and can be hosted anywhere. One or more Caddy servers cache and load balance against identical origin servers. By serving content from Souin's in-memory cache, user requests are responded to more quickly and origin servers will see reduced load since they won't have to serve the content. By using Caddy's built-in health checks, we will enable automated failover if an origin server goes down. We will also use Caddy's templating features to dynamically generate platform error pages. Additionally, we could add a shared storage option and bring in additional Caddy servers, perhaps in geographically different locations, to optimize service globally.
Get Started
Compiling Caddy with Modules using Xcaddy
We want to cache common responses to user requests based on the standard Cache-Control HTTP header. This is not a feature that Caddy has built-in, but rather something offered by an open-source module called Souin. We can use a tool called Xcaddy to build a Caddy binary with this module.
After installing Xcaddy, you should be able to run it from your terminal:
./xcaddy build v2.10.0 --output caddysouin github.com/darkweak/souin/plugins/caddy
This should output a binary file that you can run directly from the terminal, or you write a service file for it. Alternatively, you can just
cp caddysouin /usr/bin/caddy
but this is not recommended in production probably.
Now that we're up and running with a custom Caddy binary compiled with the Souin cache module, let's start writing our configuration.
Config File Structure
Let's start by figuring out how we want our Caddyfile to be organized. Remember, you can split your Caddyfile up into separate files and import them using Caddy's Import feature.
├── /etc/caddy/
│   ├── Caddyfile
│   ├── imports/
│   │   ├── global
│   │   ├── tls
│   │   ├── routing
│   │   ├── default
│   │   └── headers
│   ├── sites/
│   │   ├── my-site.com
│   │   ├── customer-site-2.com
│   │   ├── ...
│   │   └── marketing-site.org
│   ├── static/
│   │   └── error.html
Using a structure like this makes it much easier to manage the configuration as the number of sites grows. A good thing to remember is that Caddy doesn't care about the file extension here, so you can use whatever you want. You can even use your custom file extension to match your import statements, e.g. import sites/*.conf.
Caddyfile: Where we import everything else
# Import our global configuration block, which always goes at the top of the Caddyfile
import imports/global

# Import our snippets. All of these files contain snippets that we can re-use in our sites.
import imports/headers
import imports/tls
import import/routing
import import/default

# Import all our site files
import sites/*
Global Configuration
The Caddyfile has a way for you to specify options that apply globally, or defaults that can be overridden per-site. Read more about all of the extensive global configuration options in the Official Caddy documentation. global
{
        # On-demand TLS configuration
        on_demand_tls {
                ask http://localhost:7200/ask
        }
        # Check Souin before proxying
        order cache before rewrite
        email tls@my-site.com
		# CA settings
        cert_issuer zerossl {YOUR-ZEROSSL-API-KEY-HERE}
        # Configure logging - we receive log streams via Logstash and store them using Logtail
        log default {
                format json
                level info
		output file /var/log/caddy/caddy.log
        }
        # Configure Souin cache
        cache {
                cache_name Souin
                log_level info
                # Don't write the cache key in HTTP headers - this prevents information leaks
                key {
                        hide
                }
                # Only cache GET, POST, PATCH requests
                allowed_http_verbs GET POST PATCH
                # Set a default TTL of 10s
                ttl 10s
                # Set a default stale life at 15s
                stale 15s
                # By default, instruct downstream entities and browsers not to cache
                default_cache_control no-store
                # Extend backend timeout to 30 seconds
                timeout {
                        backend 30s
                }
        }
}
In this file, we've set up the first part of on-demand TLS, our ACME info, our ZeroSSL API key (in this case), logging to a file, and our basic cache setup.
Dynamically-generated Error Pages
We're going to combine two of Caddy's best features: Templates and Placeholders to dynamically generate error pages. error.html:
<html>
	<head>
		<title>Error {{placeholder "http.error.status_code"}} - Ad Agency</title>
	</head>
	<body>
		<h1>Error - Ad Agency</h1>
		<h3>Troubleshooting Information</h3>
		<p>Your IP: {{placeholder "http.vars.client_ip"}}</p>
		<p>Error {{placeholder "http.error.status_code"}}</p>
	</body>
</html>
{{placeholder "http.error.status_code"}} becomes to the 3-digit status code, e.g. 404 {{placeholder "http.vars.client_ip"}} becomes the client IP as detected by Caddy
This is widely extensible as there are lots of Caddy placeholders that you can use to provide more information or even redirect users elsewhere. In order to intercept errors and bypass our existing error pages, we'll need to use a custom snippet. Check out the routing section below for a snippet called intercept-errors to see how we use it.
Snippet Files
These files are where we are going to store snippets of configuration that we can import and reuse in other parts of our configuration.
headers
# We will import this on all sites for logging and organization
(headers-default) {
	# Add a header
	header +X-Powered-By YourNameHere
	# Use a Caddy placeholder to write the hostname of the proxy serving the traffic - easier for troubleshooting
	header +Via {system.hostname}
}
# Import this on matchers where we want to prevent the response from being cached by the client
(no-browser-cache) {
	# Rewrite the cache-control response header to no-store to instruct browsers not to store it
	header >cache-control no-store
}
tls
# Import this on sites where we want to use on-demand TLS.
(on-demand-tls) {
    tls {
        on_demand
    }
}
routing
&(origins) {
	reverse_proxy {
		# Define our origin servers
		to https://10.100.15.20 https://10.100.15.21 https://10.100.15.22 https://10.100.15.23 https://10.100.15.24
		# Load balancer & passive health checks
		lb_retries 30
		max_fails 10
		unhealthy_latency 10000ms
		# Active health checks
		health_port 443
        health_interval 1m
        health_timeout 5s
        health_status 2xx
		# Define a healthcheck page
        health_uri /healthcheck
	}
}

(intercept-errors) {
		# We only want to intercept 5xx errors, that way we only intercept errors and display our own page when there's an issue with the origin server. 4xx errors will still be proxied to return the customer's own error pages.
		handle_errors 5xx {
			rewrite * /error.html
			# This is the directive that tells Caddy to replace our placeholders in index.html with real data.
			templates
			file_server
	}
}
Default Snippet
Let's bring it all together in one nifty snippet:
(default) {
	import headers-default
	import on-demand-tls
	import intercept-errors
	invoke origins
}
That's it for our snippet files. Now let's move on to the sites themselves.
Site Configuration
For each site that we want to serve, we should create a separate file, matching a format like this:
# Add all domains that the website will be served under.
www.my-site.com,
my-site.com {
	import default
}
That's... actually it! For all of our sites, we can just use import default and keep things simple. Remember that extra header snippet we wrote earlier to prevent browser caching? Let's implement that for a specific subdirectory /app on a site to show you should you can deviate from the default:
www.my-site.com,
my-site.com {
	handle /app/* {
		import no-browser-cache
		import default
	}
	import default
}
Conclusion
In this scenario you learned how to configure a scalable, caching, load-balancing web server in front of your web services, speeding up response times and reducing load on your app servers. With this set up, you'll be able to add new sites with automatic HTTPS in just a few configuration lines.
Continue Reading
Please check out Caddy's official documentation site to learn about everything you can do with Caddy server to build a scalable web platform.
Want to learn more about Caddy?
Visit their official website at caddyserver.com Read through the docs at caddyserver.com/docs If you use it, sponsor the project (we do!) caddyserver.com/sponsor
This post is one of a series of tutorials about Caddy Server. You can view all relevant posts here.